Forum
Forum Finance
 Specials
 On-chain Eco
 Entry
Entry
 Podcasts
 Activities
 OPRR
OPRR

Step-by-step guide on extracting ETH from the Base chain before going live on the official bridging UI.
Original author: @0xCygaar
Original translation: Jaleel, cookie, BlockBeats
Editor's note: Just over an hour ago, the project team behind the "meme dragon" $BALD on Coinbase's Layer2 network Base suddenly withdrew a total of 8,660 ETH and 179 million $BALD liquidity within 7 minutes. The price of $BALD fell sharply, with a maximum drop of 80%.
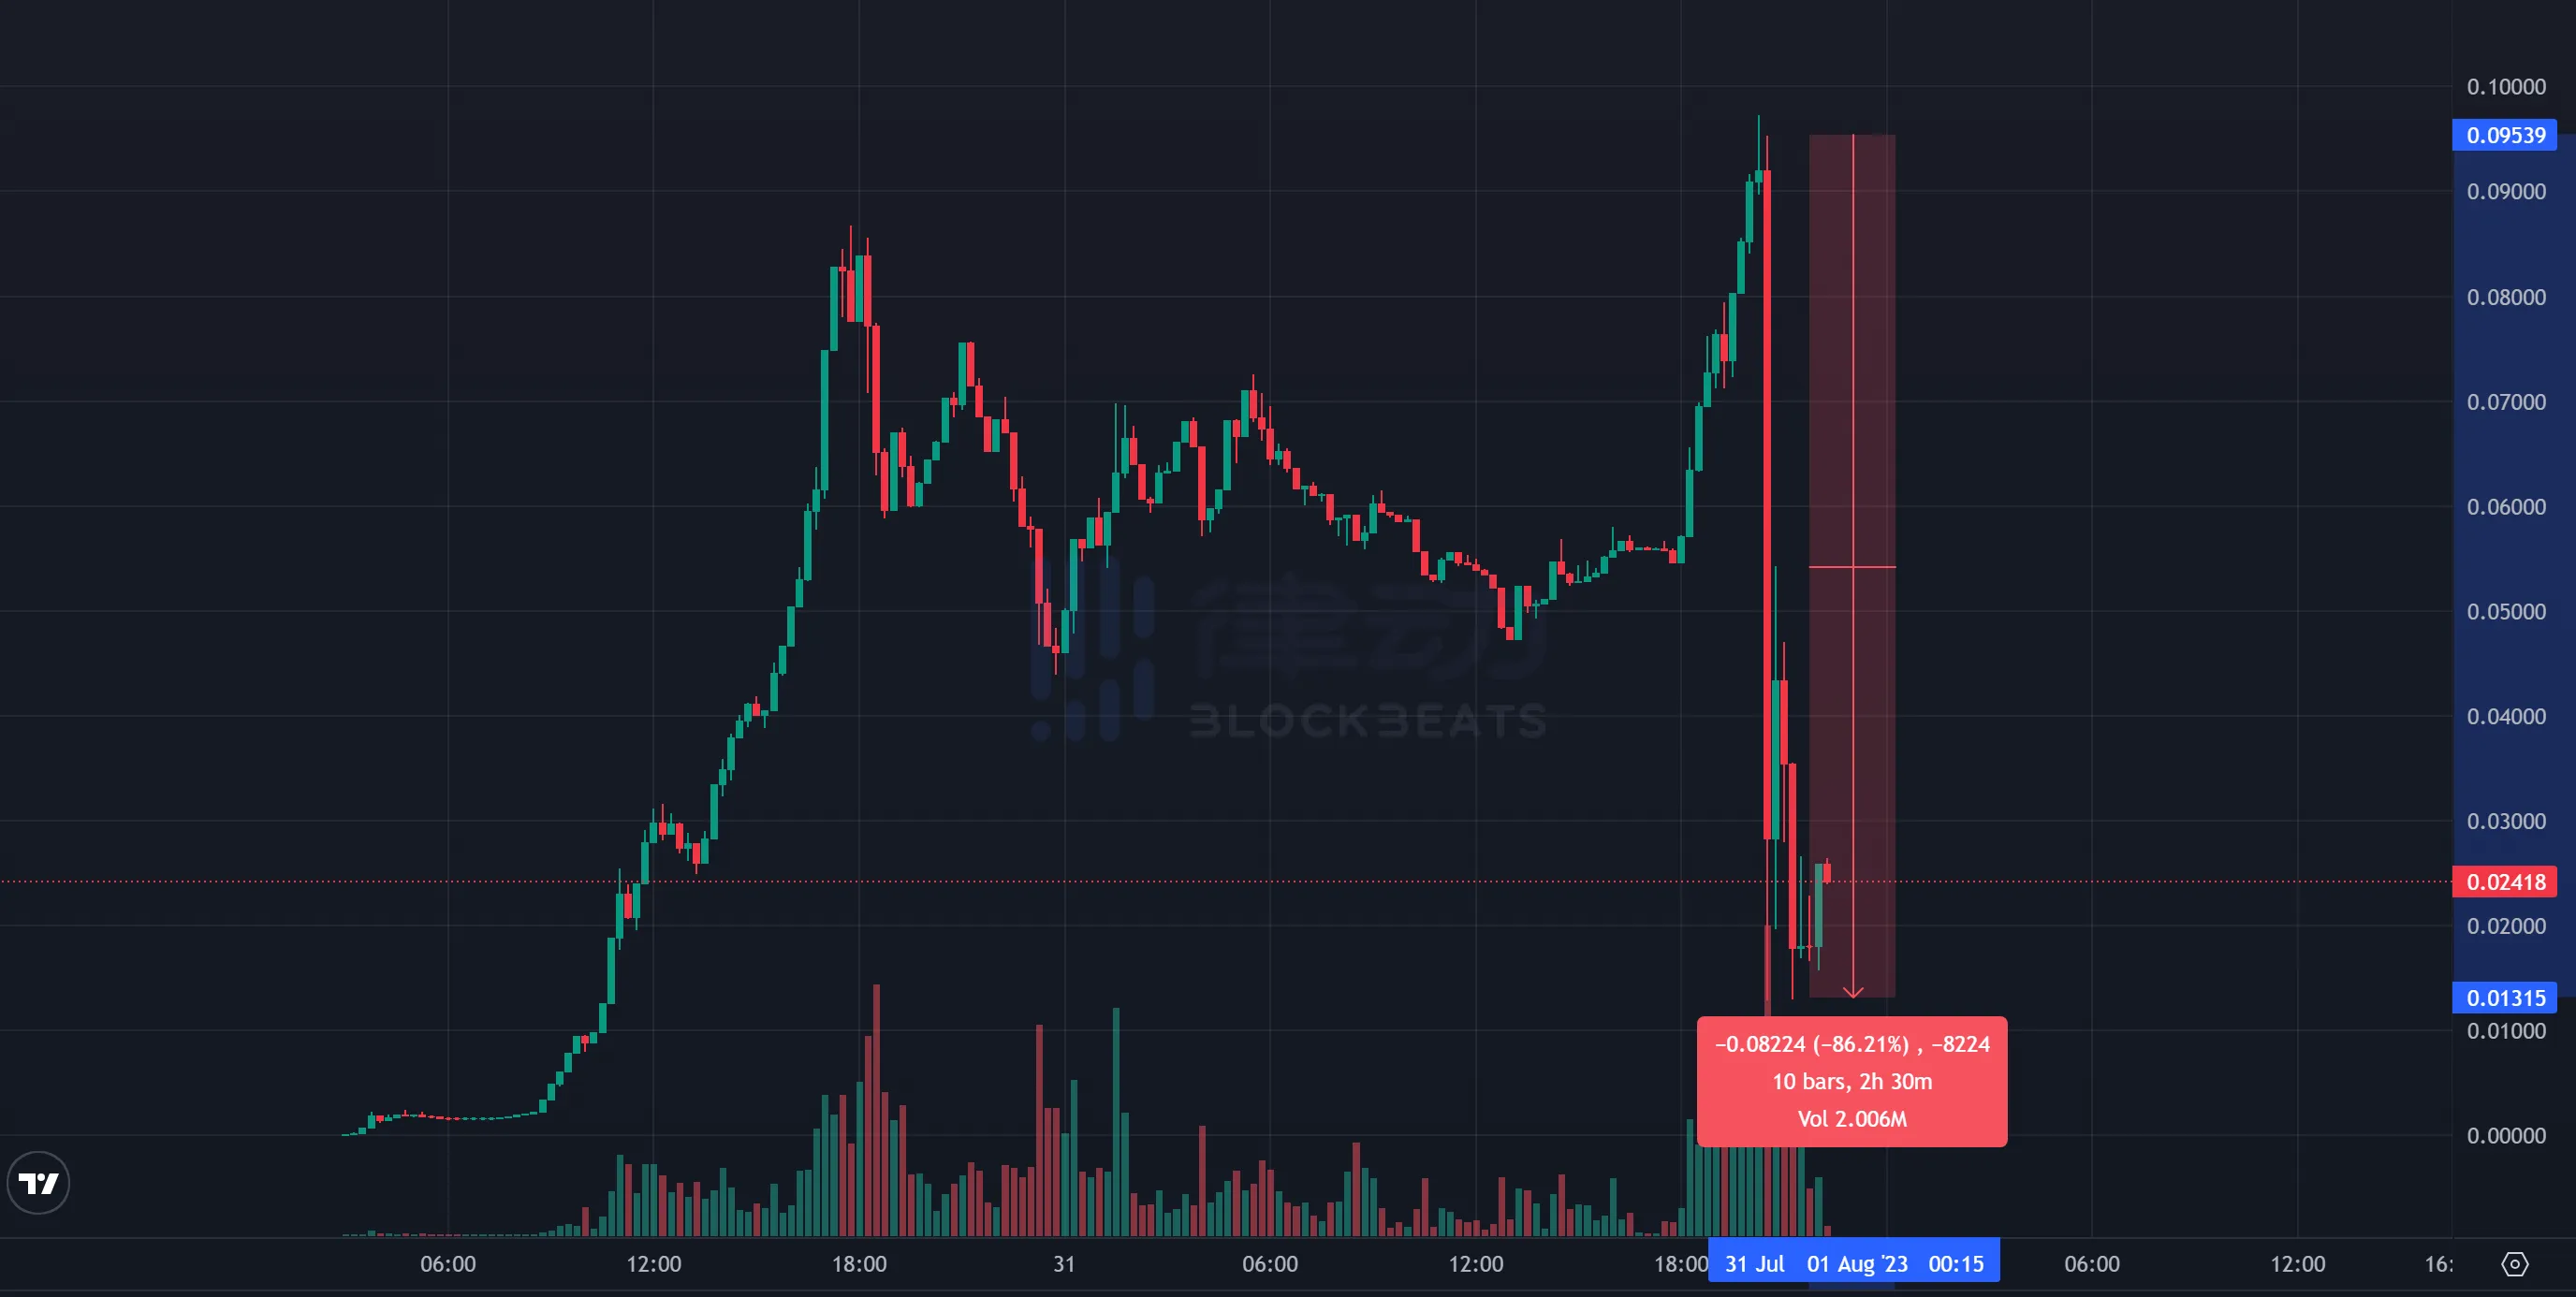
Although the project team added back 400 ETH liquidity in the following half hour, it was too little too late to restore shattered confidence. Due to the lack of cross-chain deposit and withdrawal on the front-end of the Base network, panic spread quietly among investors who feared they would not be able to withdraw their ETH to the main network. There were even voices outside the scene calling for discounted purchases of ETH on the Base network.
In fact, although there is no front-end recharge and withdrawal page, it is still possible to withdraw ETH across chains to the Base network now, so there is no need to panic. However, currently, it is necessary to install git and golang on the PC to run the withdrawal script. Due to the complexity of the process, it is strongly recommended to wait for Coinbase to release the official cross-chain bridge front-end. This guide is designed for those who absolutely need to bridge now and do not want to wait for the official bridge UI to come out.
This article was written by @0xCygaar on July 31st. The following is the original translation by BlockBeats:
Nowadays, everyone claims that bridging to the Base chain is a one-way process and cannot withdraw funds. But is this true?
In fact, we can use the native withdrawal process to retrieve funds back to the mainnet after 7 days. If you need to bridge back to Ethereum, here is a comprehensive guide:
Base Chain is essentially a 1-to-1 fork of Optimism, which means we can leverage all the features that OP has. This includes a local withdrawal process that allows you to move ETH from Base back to the mainnet. The downside is that due to the challenge period, this takes 7 days.
Why does it take 7 days? Because Optimistic Rollups requires enough time to challenge potential fraudulent claims. Due to this 7-day deadline, most people will use third-party bridging to bridge back to the main network faster. However, local withdrawal methods should always be effective.
Before proceeding, please note that the second half of this guide requires you to have git and golang installed on your computer to run a script for withdrawals. If you haven't installed either of them, I suggest waiting for Coinbase to release their official bridge frontend.
Here is how you should fill in the fields:
1) withdraw - This is the amount of ETH you want to bridge back to the main network.
2) _l2Token - Using value 0xDeadDeAddeAddEAddeadDEaDDEAdDeaDDeAD0000. This is the ETH token address on Base.
3) _amount - This should be the same value as used in Part 1, but converted to wei. You can use the following link for conversion: https://eth-converter.com.
4) _minGasLimit - Input 0
5) _extraData - Input 0x
Submit the transaction and save the transaction hash. We will mention it later.
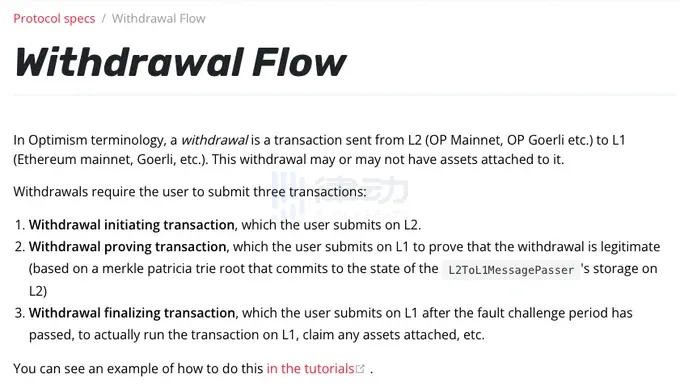
Before I explain the next step, let's talk a little bit about how OP handles withdrawals. After the Bedrock upgrade, users need to do two things before withdrawing. First, they need to submit proof to L1 that they have made a withdrawal on L2 (in this case, Base).
After this, users must wait for 7 days to allow any external party the opportunity to challenge and prove. If no challenge occurs, users can complete the withdrawal on L1. There is a great user interface on the OP mainnet to facilitate this, and for Base, we will use command line tools.
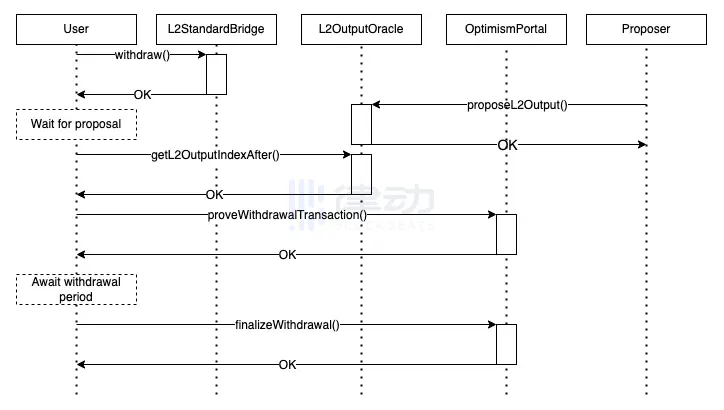
Here is the command-line tool for withdrawal written by the Base team: https://github.com/base-org/withdrawer (Thanks to @steveklbnf for this). Clone the repository locally and run "go install" in the folder. You should be able to run the withdrawal command.
README explains what needs to be done, but essentially you will run the withdrawal command with the necessary inputs - the transaction hash mentioned above, the RPC URL (you can use Alchemy/Infura), and the private key of the withdrawal account (do not share your private key anywhere). After running this command, you will receive a transaction hash. You can confirm that your proof has been submitted by searching for this transaction hash on Etherscan (for the mainnet).

Then, you must wait for 7 days before you can proceed. Once this challenge period is over, you can run the second command in the README to complete the withdrawal. The official user interface is likely to be released before then, which will make this process easier.
The OP technology stack always has a bridging method from L2 to L1, and they have created a user interface to simplify this process. This guide applies to all OP technology stack chains. For a complete explanation of the withdrawal process, please read more here: https://community.optimism.io/docs/protocol/withdrawal-flow/#
This is the complete guide on how to extract ETH from the Base chain before the official bridging UI goes live. It is not particularly difficult to withdraw ETH from the Base chain, but it does require some technical knowledge. It is important to note that this guide is intended for those who absolutely need to bridge now and do not want to wait for the official bridging UI to be released.
Welcome to join the official BlockBeats community:
Telegram Subscription Group: https://t.me/theblockbeats
Telegram Discussion Group: https://t.me/BlockBeats_App
Official Twitter Account: https://twitter.com/BlockBeatsAsia